HABITATS AND ECOSYSTEMS
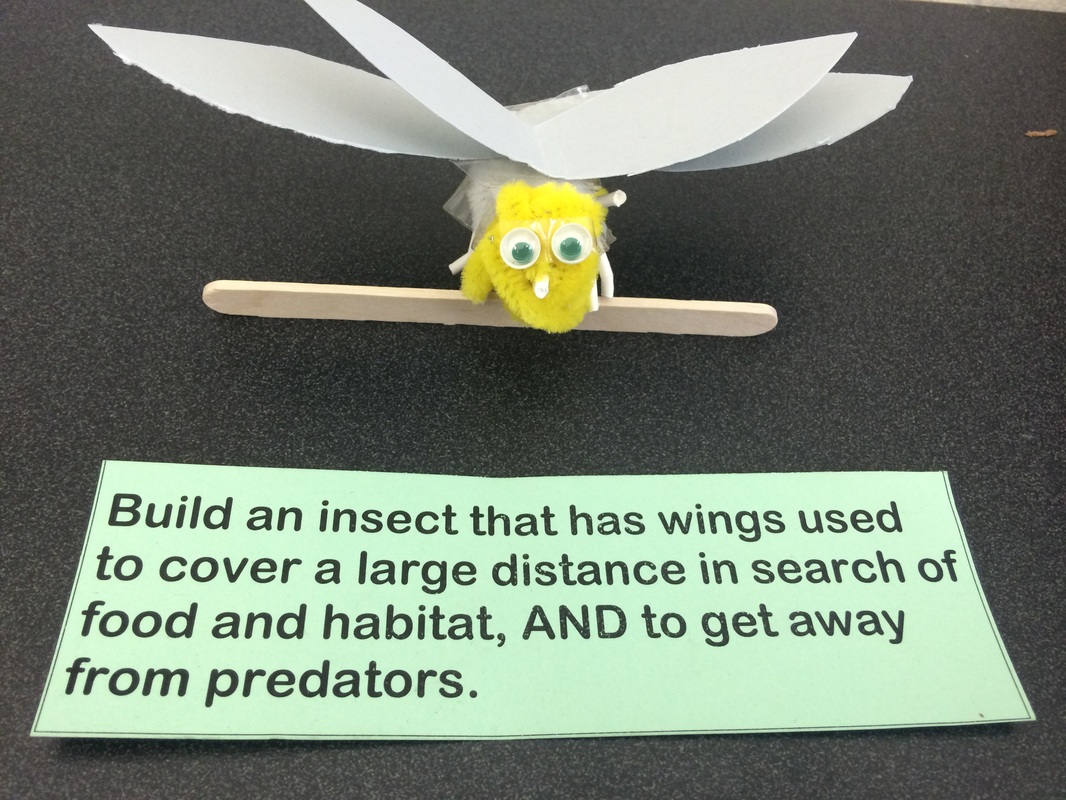
Insects and other garden invertebrates steal the spotlight in this introductory unit on habitat, ecosystems and population dynamics. Students learn the basics on these topics using the garden as a backdrop for exploration and scientific inquiry. Taking it a step further, students demonstrate their new found knowledge by designing and building an insect or other invertebrate with specific adaptations to the habitat they inhabit.
Objectives
Students will be able to: • list 3 or more creatures that live in the garden and how they are connected • plan and implement a population count for their garden • list 3 or more ways they can improve the garden habitat for animal life Oregon Content Standards: K-8.MP Mathematical Practices K.CC Counting and Cardinality K.MD.G Classify objects and count the number of objects in each category. K.1P.1 Compare and contrast characteristics of living and non-living things. K.3S.2 Make observations about the natural world 1.2L.1 Describe the basic needs of living things. 1.3S.1 Identify and use tools to make careful observations and answer questions about the natural world. 1.3S.2 Record observations with pictures, numbers, or written statements. 2.OA.C Work with equal groups of objects to gain foundations for multiplication. 2.3S.3 Make, describe, and compare observations, and organize recorded data. 3.OA.A Represent and solve problems involving multiplication and division. Vocabulary Organic, ecosystem, monocropping, intercropping, companion planting Objectives Students will be able to: • design an experiment or project • identify two plants that can be grown together beneficially Oregon Content Standards: K.3 Scientific Inquiry 1.3 Scientific Inquiry 2.3 Scientific Inquiry 3.3 Scientific Inquiry 4.2L.1 Describe the interactions of organisms and the environment where they live. 4.3 Scientific Inquiry 5.2L.1 Explain the interdependence of plants, animals, and environment, and how adaptation influences survival. 5.3 Scientific Inquiry 6.3 Scientific Inquiry 7.3 Scientific Inquiry 8.3 Scientific Inquiry Objectives Students will be able to: • list the parts to a flower; • show how to pollinate flowers • explain the best pollination technique for at least one type of plant Oregon Content Standards: K.3 Scientific Inquiry 1.1L.1 Compare and contrast characteristics among individuals within one plant or animal group. 1.3 Scientific Inquiry 2.2L.1 Describe life cycles of living things. 2.3 Scientific Inquiry 3.3 Scientific Inquiry 4.3 Scientific Inquiry 5.1L.1 Explain that organisms are composed of parts that function together to form a living system. 5.3 Scientific Inquiry 6.3 Scientific Inquiry 7.1L.1 Compare and contrast sexual and asexual reproduction. Explain why reproduction is essential to the continuation of every species. 7.3 Scientific Inquiry 8.3 Scientific Inquiry ET.1.B Create original works as a means of personal or group expression. ET.2.B Effectively communicate and publish to multiple audiences using a variety of media and formats. ET.2.D Contribute to project teams. Produce original works or solve problems in a team setting. |
Habitats PDFBackground
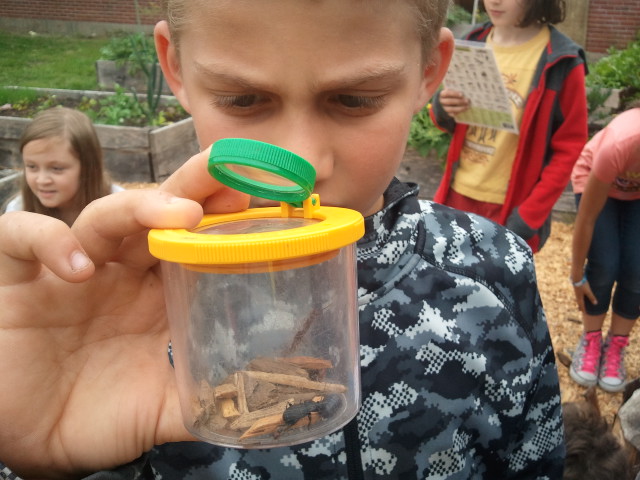
Habitats are an area or environment where an organism or ecological community normally lives or occurs. Within the habitat is everything an organism needs to survive: water, food, shelter and space. Gardens are a habitat for many different creatures. Some are big (people, cats, raccoons, birds) and some are very small (worms, ladybugs, butterflies, bees). All of the creatures that live in the garden, both plants and animals, are connected through the garden food chain. Sun - chard - aphid - ladybug - robin - worms Above is an example of a garden food chain. Plants like chard are producers. They use the energy from the sun to create food through photosynthesis. Animals, on the other hand, cannot create their own food. They get their energy from eating other creatures and are called consumers. Aphids are a type of herbivore- they love to eat chard and use its leaves as shelter. Ladybugs are carnivores- they eat other animals to survive- and aphids are one of their favorite snacks. In turn, ladybugs are eaten by birds, who are often omnivores. They’ll eat other animals (usually insects) and parts of plants like seeds. When the bird passes away or is killed by something else, decomposers like worms, bacteria and fungus will break it down. They help release the stored nutrients in the bird back into the soil, which will ultimately feed the food chain again. Within the habitat of the garden, nothing can exist without something else. In the garden, students spend a lot of time intimately involved with the plants they’re growing. The up close and personal reality of gardening makes it a great place to focus in on invertebrates. Invertebrates are animals without bones. Insects are a type of invertebrate. They have a chitinous exoskeleton, a three-part body (head, thorax, and abdomen), three pairs of jointed legs, compound eyes, and two antennae. There are more than a million different insects and they represent more than half of all the living organisms in the world! Unfortunately, insects are often viewed with distaste and considered “bad”. Many people don’t understand the important roles they play in ecosystems, especially in gardens. For the purpose of the garden we can split insects into two different types- pests and beneficials. A beneficial insect is one that is obviously helpful to our gardens- they are pollinators, decomposers, or predators of pests. A pest is an insect that is harmful in the garden. They may sting us or damage our plants (by eating or nesting in them). Both these terms- beneficial and pestare completely subjective. Every insect in the garden has an important role to play. Common Insect Pests (considered pests because most are herbivores and they eat plants): Aphids, Cutworm, Cabbage maggot, Flea beetle, Cabbage worm, Garden symphylan, Cucumber beetle Common Beneficial Insects (usually these are predators): Western damsel bug, Lady beetle, Green lacewing, Minute pirate bug Project Creating Garden Habitat Length- three 1 hour sessions Materials- four corners signs, clipboards, paper, garden map, string/stakes or hoola hoops, insect/bird/ amphibian/reptile books, various materials for creating shelter/water/food Preparation- make a garden map with a grid, gather materials 1) In this project, students will be trying to improve the habitat in their garden. Start by getting them to think about what is in the garden with the Four Corners Habitat activity listed below. 2) Explain that they are going to be working to improve the garden habitat for the animals in the garden. In order to do that, they first need to know what’s living in the garden. Have students brainstorm ways that they can figure this out. You’re probably going to end up simply looking to see what’s living in the garden. Scientists would call this a survey. Surveying the entire garden is going to be rather difficult because most of the animals you’re going to find will be very small invertebrates. In order to make sure that you don’t miss the small things, you’ll need to be searching systematically. Challenge the students to come up with a way to do that. Let them brainstorm as a whole group thinking about these questions: o Are they going to search the whole garden? o Parts of the garden? o Where will they look? o How will they choose where they look? Now give them a couple examples of surveys that scientists use and let the students decide how they want to do their survey. Block Sample Counts- In this type of survey the garden is broken up into equal sized squares on a map. Then 5 or 6 squares are chosen at random. (An easy way is to have a student close their eyes and randomly pick a spot on the map.) The squares are staked out with string and the students will search for animals in their square, writing down and counting every animal they see there. Then you can multiply their findings by the number of squares in the garden to figure out the population of each animal they found. Strip Counts- Stake out strips equal distance apart running through the garden. Pick either every other strip or pick a few strips at random. Students will walk in their strip, writing down every animal they notice in that space. Once again, their findings are multiplied to figure out how many animals there are in the whole garden. 3) Now students will need to decide how to use the data they collected. Do they want to increase the habitat for all the animals they found in the garden? Are there some animals that are more helpful for the garden that they want to increase the population of? Are there animals that they found that they don’t know anything about and need to learn about before they can decide what they want to do? Was there an animal that they would like to have in the garden that wasn’t there? In the end, have each group pick one animal that they are going to try to improve the garden habitat for. 4) Now that they have their animal picked out, students will research what that animal eats, what it likes to live in, etc. and make a plan for how they can help it do better in the garden. Some ideas for how they can help improve the habitat for their animal: o grow a plant that it likes to live on or lay eggs on (monarch butterflies need milkweed for their young) o build it a house/shelter (make a bee house, bird house, toad house) o give it a better water source (build a bird bath) o give it more food (bird or hummingbird feeder, plant more flowers/hedge row) 5) Lastly, students will implement their plan. Older students can do a second population survey a few weeks or months later to see if their efforts did in fact help to increase the population or not. STEM Professional Connection: If you can find a researcher who does population surveys to come talk to the students, that might be really helpful. Otherwise, once the students decide which animal they want to increase the population of in the garden, have them connect with a scientist who is an expert on that creature to get ideas for how they can help their animal. Activities The activities below can be used to introduce or review the project concepts. Four Corners Habitat Activity Length- 10 minutes Materials- signs, paper, pencils, clipboards Preparation- make signs Post the following words up in the four corners of the garden: “Plants”, “Animals”, “Non-Living Things”, “Human Made Things”. Divide the class into four smaller groups. Each group will travel to the four corners of the garden brainstorming a list of what they observe in the garden for each category. Give them a couple minutes at each spot. Then explain that all of the things they listed make up the habitat of the garden. They’re all connected. Habitats have to have food, water, shelter and space for the organisms living in them. Have each group pick one organism from their list and connect that organism to other things on their list. What provides that organism with food, water, shelter and space? Am I an Insect? Length- 5-10 minutes Materials- Am I an Insect cards Preparation- gather materials, review insect body parts This is a good introduction to what defines an insect. Split into small groups. Give each group some Am I an Insect? cards and have them decide which they think are insects and which are not. Show them the diagram of an insect and point out the 3 body parts and the 6 legs that an animal must have to be an insect. Distinguish between pests and beneficial insects and explain that insects are really important for the health of the garden. You can also have them sing the insect parts song to reinforce insect parts. It goes just like “Head, Shoulder, Knees and Toes”. Head, Thorax, Abdomen, and six legs. Head, Thorax, Abdomen, and six legs. Two antennae and an exoskeleton… Head, Thorax, Abdomen and six legs! Bug Hunt Length- 15-20 minutes Materials- bug nets (gold fish nets work fine), clear jars, insect field guides, magnifiers Preparation- gather materials Students will be going on a bug hunt in the garden to see what they can find. Give each pair a bug net and some clear jars to put things in. After 10 minutes or so, have them use an insect field guide to figure out what types of insects they found. They will present their insects to the rest of the group. Discuss which are beneficial insects for the garden and which are considered pests. This activity is best done on a sunny day in the fall or spring. During rainy days it will be a lot harder for the students to find insects. You can transfer this search to the compost pile on less than ideal days. Insect Bingo Length- 15 minutes Materials- insect bingo cards Preparation- get/make the bingo sheets This is an easy way to get students to focus on the insects in the garden. Having a card/sheet with insects listed and pictured for them to find gives students a set goal, which is sometimes easier than having them looking randomly for insects. Send the students in pairs or groups with their bingo cards to search. Assign them an adult to go back to who will mark off their squares when they find something. This activity is best done on a sunny day in the fall or spring. Rain and wet makes it much harder for them to find insects and they sometimes get discouraged. Preying Mantis Game Length- 10-20 minutes Materials- blindfold Preparation- gather the blindfolds This game helps students think about predator/prey relationships within the garden. One student is an aphid or caterpillar in the middle of the circle. They are blindfolded. Everyone around the outside of the circle is a preying mantis. Preying mantis are such successful garden predators because they are very stealthy. When you point at a student on the outside of the circle, they get to sneak up on the prey in the middle of the circle and try to tap their shoulder. If the prey hears them coming and points at them, they have to go back and another “mantis” gets a turn. The prey has to point in the correct direction that the “mantis” is coming from. If they are pointing wildly, it doesn’t count. If the mantis does tap the prey on the shoulder they win and now get to take a turn as prey in the middle. Habitat Critter Tag Length- 10-15 minutes Materials- none Preparation- set up the boundaries for the game This game is a good way to focus in on the key needs of organisms within a habitat. Set up the game with two even lines of kids facing one another. One line of kids will be the critters and the other line will be parts of the habitat. There are three parts to the habitat in this game: o Shelter- hands joined together over their heads o Water- hand up like you’re drinking from a cup o Food- hands on belly Have the kids practice making these signs. Now all the kids turn around so they can’t see the other line. All the critters will decide if they want to find food, water or shelter and they’ll show the sign for the thing they’re looking for. All the students who are habitat will decide if they are going to be food, water or shelter. When you say, “Go!” the kids all turn around. Kids on the habitat line stay where they are. Kids on the critters line run to the habitat line and try to find someone who will has the same sign as them. They’ll bring that person back with them to the critter line. Any critter who doesn’t find their match dies and becomes part of the habitat. Continue to play rounds. The population of critters and the amount of habitat will fluctuate as the game goes on, which is what often happens in nature. Web of Life Length- 10 minutes Materials- living and non-living cards, ball of yarn Preparation- gather materials Pass out a card to each student. Have them hold their cards so that everyone can see what they have. In this game the students will be trying to make as many connections between the cards as they can. Start with the student holding the sun card. They will hold onto the end of the yarn and pick one other person (based on the card they’re holding) who needs them. From there the yarn is unrolled and passed around the circle, making connections between creatures until the yarn is gone or everyone in the group is holding onto the string. If one organism or part of a habitat in the circle has a problem then everything is affected. You can simulate this by having one person tug gently on the yarn. Anyone who feels the tug also tugs until everyone feels the effects. Module 6: Organic Gardening Organic Gardening PDF Background There are many different definitions for what makes an organic garden. The easiest definition means that you are gardening without the use of potentially harmful pesticides, herbicides and chemical fertilizers. But there’s a lot more that goes into it. Oregon Tilth says that, “Organic food production is based on a system of farming that mimics natural ecosystems and maintains and replenishes the fertility and nutrients of the soil. Organic Production integrates cultural, biological and mechanical practices that foster cycling of resources, promote ecological balance and conserve biodiversity.” This can be boiled down into looking at the garden as a whole ecosystem that you’re doing your best to nurture and take care of. Keeping your school garden organic is practical. By avoiding chemicals that could be harmful to students, you know that they can pick anything off the vine and eat it right then and there in the garden. But there are other benefits. An organic garden is an alive garden, full of all sorts of creatures for students to learn about. Organic gardening is all about balance. You’re doing your best to keep your plants healthy as possible because you’re not going to be using fertilizers to artificially help them. Healthy plants means making sure that all the plant needs are met, creating and constantly improving the soil, and keeping the garden diverse. Monocropping (growing lots of only one thing) doesn’t work well organically. Along with that one crop you will be growing lots and lots of the insects that will eat it. Intercropping (growing more than one type of plant close together) decreases pest insect populations and can benefit the two plants. For example, corn can provide something for runner beans to grow up or shade for other plants. In organic gardening we try encourage beneficial insects into our garden and discourage those we consider pests. We can do this by understanding the life cycle of insects and knowing what each insect likes to eat. Sometimes avoiding problems with insect pests can be as simple as planting their favorite food before they’ve hatched out for the season or covering young plants with a floating row cover (remay) so pests can’t get to them. We can grow things that we know will attract beneficial insects or put out traps for pests. Sometimes these traps can be other plants that are either a deterrent or decoy. Usually if we pay attention and are careful, pests don’t become a huge problem in our gardens and all the beneficial insects that we’ve provided great habitat for will help our plants grow healthier! Project Companion Planting Length- 30 min-1 hour once or twice a week, over multiple weeks (at least 2) Materials- garden books, clipboards, paper, pencils, seeds/starts Preparation- gather materials, review a companion plant list 1) Some plants grow better with other plants than alone. This can be for various reasons. One of the plants might discourage insect pests or attract them- acting as an insect trap, leaving the other plant untouched. Other plants give nutrients to each other, making them both grow better together than they do alone. In this activity, students will design an experiment to test out some companion plantings to see how well they work. 2) First students, in small groups, will need to pick out one plant that they want to grow based on the current season. Then they should look through a garden book or on-line to find companion plant lists and pick another plant to grow with the one they first chose. Most of the companion plant lists will go into some explanation of why the two crops grow well together. As they develop their hypothesis and experimental procedure, they’ll want to be sure to have a control group- a space where one or both of their plants are being grown without other plants mixed in. 3) Next, the groups will set up their experiment and plant. They will measure the change over time in their plants. Part of the set up for their experiment will be deciding how they are going to measure this change. Will it be in the size of the plant itself? In how many or how few insect pests are on their plants? In the number or pounds of vegetables/fruit the plants produce? This experiment can be a long one- spanning the whole spring or fall. Or it can be a shorter one where they just notice the changes over a few weeks. If you’re wanting to save time with a shorter experiment, you’ll need to limit the plants the students can plant to short-lived plants that grow quickly. 4) Lastly, students will use their data to draw conclusions about how well their companion planting experiment really worked. They’ll also want to decide if their results were actually based on the plant interactions, or if it was based on the way they set up the experiment. If they were going to do it again, would they change anything? STEM Professional Connection: This would be a good project to have a master gardener come talk to the students about companion planting. Culminating Project Length- depends on the projects Materials- depends on the projects Preparation- depends on the projects 1) In this project, the goal will be for students in small groups to design an end of the year project that will follow organic gardening principals to improve the health of the garden ecosystem. Because of its open-ended nature, it’s going to be a better project for older students than younger ones. Start by having the students make a brainstorming map to show what goes into having a healthy organic garden. 2) Using this brainstorming map, the students will get into small groups and come up with something they want to do to improve the garden. They need to be able to explain how their project will improve the garden ecosystem. This could be something simple- making compost for the garden or something more complicated- creating a pollinator hedgerow around the border of the garden. It’s their project so it can be anything their interested in. Perhaps their project is more of an experiment- creating different kinds of natural bug repellants and seeing which works best. 3) After they have made a plan for their project, they will implement it. That might be mean setting up an experiment, building or planting something. 4) They will finish by blogging about what they did to share with others how they chose to improve their garden. STEM Professional Connection: This is the sort of project where is could be really useful for students to talk to local STEM professionals but it will depend on what they choose to do. Activities The activities below can be used to introduce or review the project concepts. Deadly Links Game Length- 15-20 minutes Materials- deadly links cards, optional armbands, poker chips Preparation- gather materials, set up boundaries for the playing area In this game, students learn about how pesticides move up the garden food chain, affecting many creatures big and small. Start by explaining the concept of a food chain and producers, consumers, herbivores and carnivores. Have students list a few garden examples of each of these. Then tell them that in this game, they will each have role to play in the garden food chain. Put the game cards in a hat or some other object. The students will line up and one at a time pick from the hat to figure out what creature they will play in the game. The plants will all go stand in one space. The herbivores will all go stand in another space, the carnivores in another and the top carnivores in another. The numbers of each of these depends on the number of kids. If you have 20 kids playing you would want 10 plants, 5 herbivores, 3 carnivores and 2 top carnivores. The plants will be going around the playing field trying to pick up poker chips, representing nutrients. Make sure a few of these chips are black or some other odd color. Whenever they get tagged by an herbivore, they have to give up their chips to the herbivore. Carnivores can tag and take chips from the herbivores and the top carnivores can tag both other carnivores and the herbivores. Whenever a player is tagged and has no chips to pass on, they die and freeze, sitting down. You can play a round where most of the players are out and then add in a decomposer who can tag dead frozen animals to put them back in the game. Once you’ve been playing for awhile, have all the students freeze and count how many chips they ended up with. Then see who ended up with a black chip. The black chips represent pesticides. If the game has gone on for awhile, you can show how the pesticide moved up the food chain to eventually effect and sicken even the top carnivores. Organic Gardening Drawing Length- 15 minutes Materials- paper, pencils, crayons Preparation- gather materials In groups, have the students use a drawing to explain what it means to have an organic garden. After 10 minutes or so, they can share their drawings with the other groups. This is a good way to finish a discussion about organic gardening. Module 6: Pollination and the Next Generation Pollination and the Next Generation PDF Background Not just a pretty plant part, flowers are the way that plants are able to reproduce and create seeds for the next generation. (As well as many tasty fruits that we get to eat!) 
http://www.tiffin.k12.oh.us/olc/page.aspx?id=12927&s=911
o The Outermost Whorl- these are the SEPALS. They are the modified leaves that cover the bud. The sepals all together are called the calyx. o The Next Outer Whorl- the PETALS. These are the showy parts of the flower that attract the pollinators. The petals altogether are called the corolla. o The Male Whorl- is called the stamen (has the word “men” in it). The stalk of the stamen is the filament and the top is the ANTHER, which creates and holds the pollen. o The Inner Female Whorl- is called the pistil, made up of the ovary (where the eggs are), the styles (the pollen tube that the pollen travels down to reach the eggs) and the STIGMA (where the pollen lands). Pollination is the transfer of pollen grains from the stamen of one flower to the stigma of the same or another flower. Anything that transfers pollen from one flower to another is called a pollinator. There are more than 100,000 species, including bees (20,000 species), moths, butterflies, bats, birds, beetles and flies. Even wind can be a pollinator- the oldest method- but it is less efficient than living pollinators since the grain of pollen must hit the exact spot on the flower for reproduction. Most plants are pollinated by organisms. Flowers and pollinators have co-evolved—where plants exhibit certain traits to attract a certain pollinator and pollinators have adapted certain physical characteristics that allow them to gather and transport pollen as they seek out food (nectar and pollen). Examples: Daisies are not picky—many pollinators can distribute its pollen, however certain flowers are dependent on only one pollinator like the saguaro cactus in the southwest pollinated only by bats. Plants may attract pollinators in a number of ways: color, unique designs (bull’s-eye, spiral), nectar, sweet smells, shapes, construction (a landing pad for bees or tubular shape for hummingbirds). While plants receive the benefit of transferred pollen, pollinators receive food for themselves and their offspring. Nectar is a sugar-based substance that contains vitamins, amino acids, and other nutrients. Pollen is a source of protein. Some plants also produce fatty oils, resin, or wax for their helpers. Project Making Fruit and Seeds Length- three 30 min-1 hour sessions, then a couple weeks of checking to see if the pollination worked and fruit is forming Materials- q-tips, wax/paper bags, tape, rubber bands, tweezers, paper, clipboards, pencils Preparation- research hand pollination techniques for various plants so you can help students as they design their experiments and gather materials 1) In this activity, students will become pollinators. They will be trying to pollinate flowers in the garden to try and make their own fruit or seeds. Good plants to do this activity with are anything in the squash family, the grass family or the tomato family. Introduce the mechanics of pollination with some of the activities listed below, especially the flower dissection. 2) Next, have groups of students pick one plant that they want to pollinate in the garden. Turn this into an experiment. (For ideas on how to set-up an experiment, look at the Plant Needs lesson in Module 2.) They will decide as a group how they are going to pollinate a few of the flowers on their plant. Questions they should answer: o How many flowers will you pollinate? (It will be good to do a few, around 5 to make sure that at least one will take.) o Does your plant have perfect (both male and female) or imperfect (separate male and female) flowers? How will that change their pollination strategies? (They will need to use one male and one female flower if the flowers are imperfect since the male flower will have the pollen but the female flower will hold the seeds.) o What pollen will you use to pollinate your flowers? Pollen from the same plant? Pollen from a different plant of the same type? Or pollen from a completely different species? o How can you make sure that only you are pollinating the flowers you pick and not insects or the wind? (Tape up or cover pollinated flowers with paper bags, lightly closed so no insects can get into them.) 3) They should write up a procedure for their experiment that will answer the above questions and come up with their hypothesis. There are a lot of great resources on-line explaining how to hand pollinate various types of plants. Students can research these techniques as they plan their experiment. You could also have a horticulturalist or plant breeder come show them various pollination techniques. 4) They will implement their experiment and collect data, documenting the process over time with pictures. Success will occur if the flowers they pollinated make fruit or seeds. They will use their pictures and other collected data to create a how-to pollination manual to post on-line. Have each group present their findings/pollination manual to the other groups. Extension: Depending on the time of year, you can later harvest the seeds from the fruit the students pollinated and then grow them to see what sort of plant they created. This can be especially striking with squash and corn because they interbreed so easily. It can also be fun to do with flowers to see what colors they end up with. STEM Professional Connection: Have a horticulturalist come talk to the group about hand pollination and why people sometimes choose to hand pollinate instead of letting other pollinators do the job. Activities The activities below can be used to introduce or review the project concepts. Flower Observations Length- 10 minutes Materials- examples of different types of flowers Preparation- gather the flowers Have the students sit in a circle around you. Hold up one of the flowers that you’ve brought. Ask the students what flowers are for (besides being pretty). Explain that flowers help plants make seeds. Hold up some of the different flowers that you brought. Ask the students to look for things that all or most of the flowers have in common. After listening a few answers tell them at even though they look different, most flowers have the same common parts because they need those parts to make seeds. Ask students why they think the petals of flowers are so nicely colored? Why do flowers often smell so nice? Why do flowers have sweet nectar in the center? Explain that the flowers need to attract pollinators so that when the pollinator is moving around in the flower they will accidentally rub some of the pollen on the right place- the pistil. The pollen then goes down the pistil’s tube to where the seeds will grow. Flowers attract pollinators to do this with their size, shape, smell, etc. Emphasize the amazement of a flower using insects to do work for them. Flower Dissections Length- 10-15 minutes Materials- flowers to dissect, flower diagram sheet, other example flowers, hand lenses Preparation- gather edible flowers Give each student, or pair of students, a flower to carefully hold and examine. They will be trying to find all the parts of their flowers so they can figure out how flowers make seeds. You can hold up the flower diagram as you go through this, pointing to each part. Hold up a flower that is still in bud form. Point out the special leaves that cover and protect the bud. Ask the students to see if they can find these special leaves (sepals), on their flower. Have them point to the sepals. Let the students know that many flowers are different and they may not each have all the parts you name. Explain that when the bud opens into a flower we can see the petals. Have the students point to the petals on their flower. Ask what they think the petals do for a flower- attract pollinators. You can show some different flower shapes and discuss the types of pollinators that would be interested in them. Flowers have a special powder called pollen. Have the students look to find the pollen on their flower. The pollen on some flowers is hard to see, so show the more visible examples around. Name the part with the pollen as the stamen. Next have the students look for the pistil. At the bottom is the ovary. This is where seeds are made. Allow the students to carefully pluck off their flower’s petals to find these parts. Using the flower diagram, show how the pollen needs to move from where it is on the stamen onto the top of the pistil. Wonder aloud, "How can it get there?" Allow the students to make some guesses. It’s fun to do this activity with edible flowers like: brassica flowers, nasturtiums, peas, etc. That way they can eat the part of the flower as they go through the dissection. Use hand lenses so students can see easily see the parts of the flowers. Insect Pollination Game Length- 10-15 minutes Materials- jello mix and flour, four bowls, cotton balls Preparation- gather materials This activity demonstrates how pollinators collect pollen from plants. Divide the group into teams and arrange them in single-file lines at one end of the playing field. At the other end of the space two tubs are placed on the ground, one with red powder and one with white powder (any colors may be used). The first member of each team runs to the first tub carrying a cotton ball and collects some pollen. The team member returns to their team and deposits the pollen in a collecting dish. The child repeats this activity for the second tub of different colored pollen. The remaining team members take turns until they have all completed the activity. Students will try to “win” by collecting the most pollen. You can discuss certain adaptive techniques animals have for collecting lots of pollen. You can also show the cross-pollination that takes place (the mixing of the red and white pollen). Wind Pollination Game Length- 10 minutes Materials- flour, flour sieve, flowers (real or fake), tape Preparation- pre-tape the flowers, gather materials This activity demonstrates the difficulty of wind pollination and explains why many plants have adapted to be pollinated by animals instead. Give one student a sifting sieve/flower shaker who stands a short distance away from the other students. The remaining members are given a flower with sticky taped centers (to collect “pollen”). The student with the sifting sieve shakes it vigorously. The others cannot move from their position by can wave their flower around to catch the “pollen.” Observe how difficult it is for pollen to transfer this way. Become a Pollinator Length- 5-10 minutes Materials- Q-tips Preparation- get q-tips Have students become pollinators by giving them each a Q-tip. Allow them to move around the garden and transfer pollen from one flower to another, specifically from anther to stigma. This is a fun, short activity for younger students. Pollinators and the Flowers Length- 10 minutes Materials- pollinator/flower cards, example flowers Preparation- print game cards, review pollinator/flower relationships This activity is a good way to introduce to older students the relationships between individual pollinators and plants. Talk about the relationship between pollinators and flowers, what they get from each other and how they’ve slowly, over time, formed to be able to use or attract each other. Certain pollinators are attracted to certain types of flowers. Some like certain smells, others like a particular color or shape to the flower. Show some example flowers if you have them so students can see the different shapes and smells of flowers. Pass out the game cards. Some students will be flowers and some will be pollinators. Have the students read the back of their card to learn about their flower or pollinator. Then when you say go they will try to find their match. If any students are left out at the end, let them join with another pair until all the pollinators have found a flower and all the flowers have a pollinator. After the game they can go around the garden in groups looking at flowers and deciding which pollinator the flowers growing there would attract based on the game. Bee Dance Length- 10-15 minutes Materials- none Preparation- none Bees are amazing pollinators. They are also, contrary to popular belief, very gentle when they’re out searching for pollen to collect because they’re focused on their work. When a bee stings you it dies, something it doesn’t want to do. Honeybees in particular are amazing creatures. When a worker bee finds a good bunch of flowers she will go back to the hive and do a dance to let the other bees know where the flowers are. There are two dances. One is the round dance. The bee moves in circles, alternating left to right. This indicates that the food source is close. The faster she turns the better the food source. If the food source is farther away she will do the waggle dance, moving in a figure eight pattern. The direction she faces when going down the long middle section shows which direction the flowers are. The more the bee buzzes during the middle part, the farther away the flowers are. In the game one person is the worker bee searching for flowers. Everyone else turns their back and closes their eyes as the worker bee goes out in the garden and picks a flower or group of flowers that it’s going to tell the rest of the group about. (If there aren’t many flowers in the garden or you’re inside you can put out some fake flowers or drawings of flowers.) When they’re ready the bee comes back to the “hive” and does their dance, showing where the flowers are. Everyone else tries to guess which flower they picked based on the dance they do. Make sure that you do a couple practice dances with the whole group before you send someone out to choose a flower. You can add onto this game by giving all the students Q-tips and having them go pollinate the chosen flowers, showing the example pollen to the group. Flower Scent Test Length- 10 minutes Materials- flowers with different smells Preparation- gather different smelling flowers Scent is a way that many flowers attract pollinators. Collect different flowers with different scents. Invite blindfolded students to smell the flowers and guess which one is which based on the smell. Try to get some flowers that smell sweet, some that are spicy and some that really don’t smell good at all. Ask the students, “If you were a pollinator, which flower would you visit?” Build a Flower/Pollinator Length- 20 minutes Materials- paper cups, pipe cleaners, tape, power from jello mixes, etc. Preparation- gather materials, make an example flower and insect for students Have participants make an insect by bending pipe cleaners into an insect shape (should be small enough to fit into the bottom of a paper cup). The students will then make a flower. o Poke a hole in the bottom of a cup. o Wrap tape, sticky side out, around a pipe cleaner (to function as the pistil) and stick it through the cup. Tape pipe cleaner to the bottom of the cup. o Sprinkle a teaspoon of powder (chalk, jello) into the bottom of the cup (to function as pollen from the anther). Have different colors for students to choose from. Students stand near to each other, holding up their flower and “flying” their insects in and out of other flowers by tossing them into other people’s cups. In the end the “insects” should be coated with various colored powders and so should the pistils. This relates to real flowers. Inside the flower is a pistil that is sticky like the tape. The pollen sticks to the pistil and is used to fertilize the ovaries in the flower. Flower Drawings Length- 10-15 minutes Materials- paper, crayons Preparation- gather materials This activity is a good way to wrap up a study of flowers. It give the students a chance to creatively imagine their own flower. Have the students draw their own personal flower and a pollinator that would be attracted to it. After drawing, students can name and share their flowers. Flower Pressings Length- 30 minutes Materials- cardboard, scissors, popsicle sticks, glue, rope, wax paper Preparation- gather materials After observing various flowers, students can press those flowers to take home. You can make a simple home-made flower press with two pieces of cardboard reinforced with criss-crossed and glued on large popsicle sticks and a piece of thin rope tied around the whole thing. Put the flowers in between the cardboard covered in wax paper. If you want to do many flowers, add more pieces of cardboard (without the popsicle sticks) between the wax paper sheets. |
